

Tutorial para Instalação de MISP em Sistemas Ubuntu
Autor: CERT.br
Versão: 1.6 — 05 de outubro de 2025
Este tutorial cobre os passos básicos para instalação de uma instância MISP em sistemas Ubuntu 24.04 LTS, incluindo hardening do sistema operacional, configuração dos pacotes do sistema e a instalação do MISP.
O MISP funciona em outras distribuições de sistemas Linux ou BSD, porém os próprios autores da ferramenta recomendam que seja utilizado o sistema Ubuntu pelos seguintes motivos:
- O suporte é maior para problemas em sistemas Ubuntu;
- O MISP é desenvolvido em Ubuntu, de forma que é a plataforma com mais chances de não ocorrerem problemas com versões de bilbiotecas ou dependências;
- Utilizar Ubuntu facilita o tratamento de issues no GitHub, facilitando o suporte.
Caso for utilizar em outro sistema, é importante que a equipe de administração de sistemas esteja atenta a interpretar possíveis erros nos processos de atualização e personalize as configurações e versões do sistema para atender aos requisitos das dependências do MISP.
Quanto à configuração mínima para o servidor, ela vai depender do uso, do número de eventos, das correlações entre eventos e vários outros fatores. Mas, uma configuração mínima sugerida, que é suficiente para atender um uso inicial do MISP, é a seguinte:
- 1 máquina virtual com 1 processador, 4 GB de RAM e 80 GB de disco.
Sumário
- 1. Considerações de Segurança
- 2. Instalação e hardening Básicos
- 3. Instalação do MariaDB, Apache, PHP e outras Dependências do MISP
- 4. Instalação do MISP
- 5. Configuração do MISP
- 6. Histórico de Revisões do Documento
1. Considerações de Segurança
Este tutorial é focado na instalação de um servidor MISP com um hardening básico e configurações de segurança, incluindo:
- Firewall de host permitindo entrada da rede de gerência e de instâncias de parceiros, e permitindo saída para a Internet;
- Acesso via SSH somente com chave criptográfica, para minimizar o sucesso de ataques de força bruta de senhas;
- Atualização do sistema e configuração para recebimento de alertas relativos a atualizações disponíveis;
- Criação de senhas fortes para o MISP e o Banco de Dados.
Além destes pontos cobertos ao longo do tutorial, seguem algumas considerações especiais sobre boas práticas de segurança que precisam ser consideradas ao implantar uma intância MISP de produção em sua organização.
1.1. Não Utilizar Imagens Baixadas da Internet para Instâncias em Produção
Existem diversas imagens virtuais disponíveis na Internet com instâncias MISP prontas para utilizar. Porém, estas imagens devem ser utilizadas somente para testes e para aprender a tecnologia.
Ao colocar uma instância em produção há diversos problemas na utilização destas imagens prontas da Internet:
- Não é possível garantir que a imagem não possua nenhum tipo de Cavalo de Troia;
- As imagens podem ter vulnerabilidades que não sejam fáceis de identificar;
- Pode não ser possível recuperar as senhas criadas no Banco de Dados e na instância MISP;
- Podem haver personalizações ou configurações feitas nas imagens, que podem atrapalhar processos futuros de atualização do sistema e do MISP.
1.2. Ter cuidados com o Certificado Digital
O objetivo do MISP é ser utilizado para conectar em instâncias de parceiros para compartilhar informações relacionadas com segurança. É imprescindível que a instância MISP implemente boas práticas no uso do certificado digital:
- Usar sempre um certificado válido, neste tutorial usaremos certificados Let's Encrypt;
- Não utilizar certificados auto assinados;
- Nunca desligar a checagem de certificados para aceitar certificados auto-assinados de outras instâncias MISP;
- Se a sua Autoridade Certificadora (AC) tiver suporte,
configurar o sistema para atualizar o certificado
automaticamente
- Firewalls de host e corporativo devem permitir entrada de conexões vindas da AC na porta 80/TCP.
1.3. Ter cuidados com Firewall, WAF e Anti-DDoS Corporativos
A instância MISP precisa ser mantida atualizada e potencialmente terá em seus eventos payloads maliciosos (malware, URLs de phishing e IoCs variados).
É imprescindível que:
- A instância MISP possa acessar a Internet, principalmente os servidores de atualização do sistema e as atualizações do MISP (GitHub);
- O WAF corporativo ou proxy reverso (se houver) não interfira no tráfego do MISP;
- Ferramentas Anti-DDoS não devem classificar acessos de instâncias parceiras como ataques (por exemplo, classificar muitos SYNs como DDoS).
2. Instalação e hardening Básicos
O primeiro passo após o Ubuntu estar com sua instalação básica é levantar imediatamente um firewall para proteger a instalação e evitar ataques vindos da Internet, principalmente de força bruta de credenciais.
2.1. Levantar o firewall
- Criar o arquivo
/root/rules.v4com o conteúdo abaixo, substituindo as variáveis.
Substituir a variável<SEU-IPv4-OU-REDE>pelo IPv4 ou rede da sua organização autorizados a acessar o MISP.
Caso sua instância esteja conectada com outras instâncias, substituir<IPv4-MISP-PARCEIRO>pelo IP da outra instância. É necessário criar uma linha por instância em que está conectado.
Caso não esteja conectado em nenhuma instância MISP, remova a linha.*filter :INPUT DROP [0:0] :FORWARD DROP [0:0] :OUTPUT DROP [0:0] :IN-NEW - [0:0] -A INPUT -i lo -j ACCEPT -A INPUT -p tcp -m tcp ! --tcp-flags FIN,SYN,RST,ACK SYN -m state --state NEW -j DROP -A INPUT -p tcp -m tcp --tcp-flags FIN,SYN,RST,PSH,ACK,URG NONE -j DROP -A INPUT -p tcp -m tcp --tcp-flags FIN,SYN FIN,SYN -j DROP -A INPUT -p tcp -m tcp --tcp-flags SYN,RST SYN,RST -j DROP -A INPUT -p tcp -m tcp --tcp-flags FIN,RST FIN,RST -j DROP -A INPUT -p tcp -m tcp --tcp-flags FIN,ACK FIN -j DROP -A INPUT -p tcp -m tcp --tcp-flags ACK,URG URG -j DROP -A INPUT -m state --state INVALID -j DROP -A INPUT -d 224.0.0.0/32 -j REJECT --reject-with icmp-port-unreachable -A INPUT -p tcp -m state --state ESTABLISHED -j ACCEPT -A INPUT -p udp -m state --state ESTABLISHED -j ACCEPT -A INPUT -p icmp -m state --state ESTABLISHED -j ACCEPT -A INPUT -p icmp -m state --state NEW,ESTABLISHED -m icmp --icmp-type 8 -j ACCEPT -A INPUT -m state --state NEW -j IN-NEW -A INPUT -j LOG --log-prefix "IPT_INPUT: " --log-level 6 -A INPUT -j DROP -A FORWARD -j LOG --log-prefix "IPT_FORWARD: " --log-level 6 -A FORWARD -j DROP -A OUTPUT -o lo -j ACCEPT -A OUTPUT -p tcp -m state --state NEW,ESTABLISHED -j ACCEPT -A OUTPUT -p udp -m state --state NEW,ESTABLISHED -j ACCEPT -A OUTPUT -p icmp -m state --state NEW,ESTABLISHED -j ACCEPT -A OUTPUT -j LOG --log-prefix "IPT_OUTPUT: " --log-level 6 -A OUTPUT -j DROP # liberar acesso SSH para a organização -A IN-NEW -s
<SEU-IPv4-OU-REDE>-p tcp -m tcp --dport 22 --tcp-flags FIN,SYN,RST,ACK SYN -j ACCEPT # liberar acesso ao MISP para a organização -A IN-NEW -s<SEU-IPv4-OU-REDE>-p tcp -m tcp --tcp-flags FIN,SYN,RST,ACK SYN -m multiport --dports 80,443 -j ACCEPT # liberar acesso ao MISP para parceiros (opcional) -A IN-NEW -s<IPv4-MISP-PARCEIRO>-p tcp -m tcp --tcp-flags FIN,SYN,RST,ACK SYN -m multiport --dports 80,443 -j ACCEPT # IPs let's encrypt (opcional) -A IN-NEW -s 66.133.109.36/32 -p tcp -m tcp --tcp-flags FIN,SYN,RST,ACK SYN --dport 80 -j ACCEPT # IPs ssllabs (opcional) -A IN-NEW -s 69.67.183.0/24 -p tcp -m tcp --tcp-flags FIN,SYN,RST,ACK SYN --dport 443 -j ACCEPT COMMIT - Criar o arquivo
/root/rules.v6com o conteúdo abaixo, substituindo as variáveis.
Substituir a variável<SEU-IPv6-OU-REDE>pelo IPv6 ou rede da sua organização autorizados a acessar o MISP.
Caso sua instância esteja conectada com outras instâncias, substituir<IPv6-MISP-PARCEIRO>pelo IP da outra instância. É necessário criar uma linha por instância em que está conectado.
Caso não esteja conectado em nenhuma instância MISP, remova a linha.*filter :INPUT DROP [0:0] :FORWARD DROP [0:0] :OUTPUT DROP [0:0] -A INPUT -i lo -j ACCEPT -A INPUT -m rt --rt-type 0 -j DROP -A INPUT -m conntrack --ctstate RELATED,ESTABLISHED -j ACCEPT -A INPUT -m conntrack --ctstate INVALID -j DROP -A INPUT -p ipv6-icmp -m icmp6 --icmpv6-type 1 -j ACCEPT -A INPUT -p ipv6-icmp -m icmp6 --icmpv6-type 2 -j ACCEPT -A INPUT -p ipv6-icmp -m icmp6 --icmpv6-type 3 -j ACCEPT -A INPUT -p ipv6-icmp -m icmp6 --icmpv6-type 4 -j ACCEPT -A INPUT -p ipv6-icmp -m icmp6 --icmpv6-type 128 -j ACCEPT -A INPUT -p ipv6-icmp -m icmp6 --icmpv6-type 129 -j ACCEPT -A INPUT -p ipv6-icmp -m icmp6 --icmpv6-type 133 -j ACCEPT -A INPUT -p ipv6-icmp -m icmp6 --icmpv6-type 134 -j ACCEPT -A INPUT -p ipv6-icmp -m icmp6 --icmpv6-type 135 -j ACCEPT -A INPUT -p ipv6-icmp -m icmp6 --icmpv6-type 136 -j ACCEPT -A INPUT -p ipv6-icmp -m icmp6 --icmpv6-type 141 -j ACCEPT -A INPUT -p ipv6-icmp -m icmp6 --icmpv6-type 142 -j ACCEPT -A INPUT -p ipv6-icmp -m icmp6 --icmpv6-type 148 -j ACCEPT -A INPUT -p ipv6-icmp -m icmp6 --icmpv6-type 149 -j ACCEPT # liberar acesso SSH para a organização -A INPUT -s
<SEU-IPv6-OU-REDE>-p tcp -m tcp --dport 22 -j ACCEPT # liberar acesso ao MISP para a organização -A INPUT -s<SEU-IPv6-OU-REDE>-p tcp -m tcp -m multiport --dports 80,443 -j ACCEPT # liberar acesso ao MISP para parceiros (opcional) -A INPUT -s<IPv6-MISP-PARCEIRO>-p tcp -m tcp -m multiport --dports 80,443 -j ACCEPT # IPs let's encrypt (opcional) -A INPUT -s 2600:3000::/29 -p tcp -m tcp --dport 80 --tcp-flags FIN,SYN,RST,ACK SYN -j ACCEPT -A INPUT -s 2600:1f00::/24 -p tcp -m tcp --dport 80 --tcp-flags FIN,SYN,RST,ACK SYN -j ACCEPT -A INPUT -s 2a05:d000::/25 -p tcp -m tcp --dport 80 --tcp-flags FIN,SYN,RST,ACK SYN -j ACCEPT # IPs ssllabs (opcional) -A INPUT -s 2602:fdaa:c6:2::/64 -p tcp -m tcp --dport 443 -j ACCEPT -A INPUT -j LOG --log-prefix "IPT_INPUT6: " --log-level 6 -A INPUT -j REJECT --reject-with icmp6-port-unreachable -A FORWARD -j REJECT --reject-with icmp6-port-unreachable -A OUTPUT -j ACCEPT COMMIT - Carregar as regras de firewall com os comandos:
# iptables-restore /root/rules.v4
# ip6tables-restore /root/rules.v6
- Verificar se as regras foram carregadas com os comandos:
# iptables -nL
# ip6tables -nL
- Tornar as modificações permanentes instalando o pacote
iptables-persistentcom os comandos:# apt update # apt install iptables-persistent -qy
- Após a instalação o iptables-persistent irá salvar as regras de
firewall que estão em memória em arquivos de regras no diretório
/etc/iptables/. Para isso responda"YES"nas duas perguntas.


- Verificar se as regras foram criadas no diretório
/etc/iptables/.
2.2. Configurar e fazer o hardening do SSH
2.2.1. Gerar na máquina do administrador um par de chaves.
Em sistemas Unix
- Gerar um novo par de chaves SSH do tipo
ed25519utilizando o comandossh-keygen.
Antes de executar, substitua<PATH-DA-CHAVE>pelo caminho completo do diretório onde o par de chaves será salvo.$ ssh-keygen -t ed25519 -q -f
<PATH-DA-CHAVE>/misp_ed25519 -C 'MISP' - Verificar se o par de chaves foi criado:
$ ls -la
<PATH-DA-CHAVE>/misp_ed25519* - Copiar o conteúdo da chave pública para o arquivo
/root/.ssh/authorized_keysdo servidor MISP:$ cat
<PATH-DA-CHAVE>/misp_ed25519.pub
Em sistemas Windows
- Baixar os aplicativos PuTTY (
putty.exe) e PuTTY Key Generator (puttygen.exe) em https://www.putty.org - Abrir o aplicativo PuTTY Key Generator (puttygen.exe), localizar
o campo
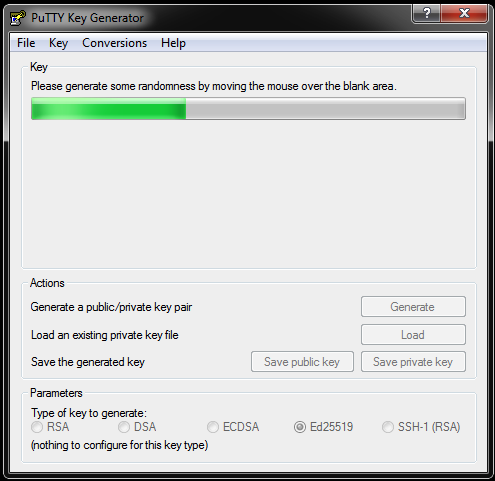
"Parameters" "Type of key to generate"e clicar emEd25519 - Movimentar o mouse até a barra verde ficar
completa.
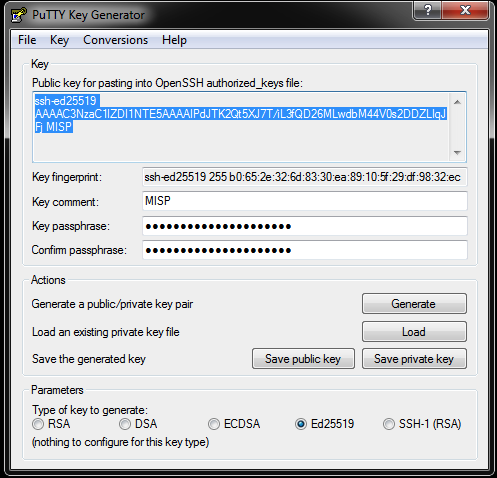
- Finalizar o processo de geração da chave:
Em"Key comment"- Digitar o nome do usuário
Em"Key passphrase"- Digitar uma senha para a chave (senha forte)
Em"Confirm passphrase"- Confirmar a senha digitada
Clicar em"Save public key"para salvar a chave pública
Clicar em"Save private key"para salvar a chave privada
Copiar o conteúdo de"Public key for pasting into OpenSSH authorized_keys file"para o arquivo/root/.ssh/authorized_keysdo servidor MISP
2.2.2. Configurar o sshd para aceitar somente logins utilizando par de chaves
- Se o servidor não possuir o
sshdinstalado, instalar com o comando:# apt-get install openssh-server -qy
- Editar o arquivo
/etc/ssh/sshd_config, procurar e alterar as seguintes opções para permitir login utilizando apenas o par de chaves:PermitRootLogin prohibit-password PubkeyAuthentication yes PasswordAuthentication no
- Reinicie o
sshdcom o comando:# service sshd restart
2.3. Ajustar o timezone para UTC e configurar o serviço NTP
É importante manter o horário do servidor sincronizado com um servidor NTP, para isso siga os seguintes passos:
- Configurar o timezone para UTC com o comando:
# timedatectl set-timezone UTC
- Configurar o serviço de NTP editando o
arquivo
/etc/systemd/timesyncd.conf
Descomentar as linhas"NTP="e"FallbackNTP="e colocar os seguintes valores:NTP=pool.ntp.org FallbackNTP=ntp.ubuntu.com
- Reiniciar o serviço
timesyncd:# systemctl restart systemd-timesyncd
- Verificar se o serviço está rodando:
# systemctl status systemd-timesyncd ● systemd-timesyncd.service - Network Time Synchronization Loaded: loaded (/usr/lib/systemd/system/systemd-timesyncd.service; enabled; preset: enabled) Active: active (running) since Fri 2025-08-22 16:16:55 UTC; 5s ago Docs: man:systemd-timesyncd.service(8) Main PID: 3524 (systemd-timesyn) Status: "Contacted time server 74.208.25.46:123 (pool.ntp.org)." Tasks: 2 (limit: 1057) Memory: 1.3M (peak: 1.6M) CPU: 60ms CGroup: /system.slice/systemd-timesyncd.service └─3524 /usr/lib/systemd/systemd-timesyncd Aug 22 16:16:55 misp-server systemd[1]: Starting systemd-timesyncd.service - Network Time Synchronization... Aug 22 16:16:55 misp-server systemd[1]: Started systemd-timesyncd.service - Network Time Synchronization. Aug 22 16:16:55 misp-server systemd-timesyncd[3524]: Contacted time server 74.208.25.46:123 (pool.ntp.org). Aug 22 16:16:55 misp-server systemd-timesyncd[3524]: Initial clock synchronization to Fri 2025-08-22 16:16:55.705693 UTC. - Verificar se o timezone foi configurado para UTC com o comando:
# timedatectl

               Local time: Fri 2025-08-22 16:19:21 UTC
           Universal time: Fri 2025-08-22 16:19:21 UTC
                 RTC time: Fri 2025-08-22 16:19:21
                Time zone: UTC (UTC, +0000) <-- Indica que o servidor está em UTC
System clock synchronized: yes
              NTP service: active
          RTC in local TZ: no
2.4. Instalar e configurar o Unbound
Um servidor recursivo local é útil para não depender de um serviço
de terceiros, que pode estar indisponível e/ou
comprometido. Adicionalmente diminui a latência nas consultas e é
capaz de validar DNSSEC. Será utilizado o
servidor unbound para este fim.
- Instalar o
unboundcom o comando:# apt install unbound -qy
- Desabilitar o
resolverdo sistema com os comandos:# systemctl disable systemd-resolved # systemctl stop systemd-resolved # rm /etc/resolv.conf
- Criar novamente o arquivo
/etc/resolv.confcom o seguinte conteúdo:nameserver ::1 nameserver 127.0.0.1
- Reiniciar o serviço do
unboundcom o comando:# systemctl restart unbound
- Testar se o
unboundestá resolvendo nomes e validando DNSSEC com as consultas:
RESULTADO com validação de DNSSEC# dig www.dnssec-failed.org @127.0.0.1 ; <<>> DiG 9.18.30-0ubuntu0.24.04.2-Ubuntu <<>> www.dnssec-failed.org @127.0.0.1 ;; global options: +cmd ;; Got answer: ;; ->>HEADER<<- opcode: QUERY, status: SERVFAIL, id: 53505 ;; flags: qr rd ra; QUERY: 1, ANSWER: 0, AUTHORITY: 0, ADDITIONAL: 1 ;; OPT PSEUDOSECTION: ; EDNS: version: 0, flags:; udp: 1232 ;; QUESTION SECTION: ;www.dnssec-failed.org. IN A ;; Query time: 347 msec ;; SERVER: 127.0.0.1#53(127.0.0.1) (UDP) ;; WHEN: Mon Aug 04 13:47:02 UTC 2025 ;; MSG SIZE rcvd: 50
RESULTADO sem validação de DNSSEC# dig www.dnssec-failed.org @127.0.0.1 ; <<>> 9.18.30-0ubuntu0.24.04.2-Ubuntu <<>> www.dnssec-failed.org @127.0.0.1 ;; global options: +cmd ;; Got answer: ;; ->>HEADER<<- opcode: QUERY, status: NOERROR, id: 54078 ;; flags: qr rd ra; QUERY: 1, ANSWER: 2, AUTHORITY: 0, ADDITIONAL: 1 ;; OPT PSEUDOSECTION: ; EDNS: version: 0, flags:; udp: 4096 ;; QUESTION SECTION: ;www.dnssec-failed.org. IN A ;; ANSWER SECTION: www.dnssec-failed.org. 6803 IN A 69.252.193.191 www.dnssec-failed.org. 6803 IN A 68.87.109.242 ;; Query time: 207 msec ;; SERVER: 127.0.0.1#53(127.0.0.1) (UDP) ;; WHEN: Mon Aug 04 13:53:39 UTC 2025 ;; MSG SIZE rcvd: 82
2.5. Atualizar o Ubuntu
- Atualizar o Ubuntu com o comando:
# apt update && apt dist-upgrade -y
Reinicie o servidor se necessário.
É fortemente recomendado manter o sistema operacional e suas aplicações sempre constantemente atualizados.
O pacote cron-apt, que será instalado
na Seção 2.5.2 ajuda nesta tarefa, pois envia
um e-mail para o administrador do sistema sempre que uma atualização
estiver disponível.
O cron-apt precisa de um MTA
instalado. Caso o servidor já possua um, prossiga para
a Seção 2.5.2.
Caso não tenha nenhum MTA instalado, instale o MTA da sua preferência ou o Postfix conforme instruções da Seção 2.5.1.
2.5.1. Instalar o Postfix
- Instalar o postfix com o comando:
# apt install postfix mailutils -qy
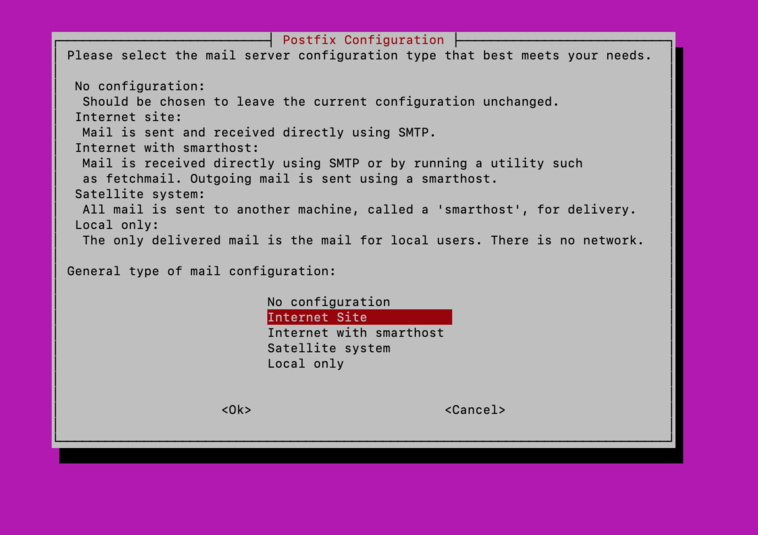
- Responder
"Internet Site"na janela"Postfix Configuration"
- Digitar seu FQDN na próxima tela:

- Verificar no
arquivo
/etc/postfix/main.cfse a diretivamynetworkscontém apenas endereçoslocalhost. O arquivo deve ser parecido com este:# See /usr/share/postfix/main.cf.dist for a commented, more complete version # Debian specific: Specifying a file name will cause the first # line of that file to be used as the name. The Debian default # is /etc/mailname. #myorigin = /etc/mailname smtpd_banner = $myhostname ESMTP $mail_name (Ubuntu) biff = no # appending .domain is the MUA's job. append_dot_mydomain = no # Uncomment the next line to generate "delayed mail" warnings #delay_warning_time = 4h readme_directory = no # See http://www.postfix.org/COMPATIBILITY_README.html -- default to 3.6 on # fresh installs. compatibility_level = 3.6 # TLS parameters smtpd_tls_cert_file=/etc/ssl/certs/ssl-cert-snakeoil.pem smtpd_tls_key_file=/etc/ssl/private/ssl-cert-snakeoil.key smtpd_use_tls=yes smtpd_tls_session_cache_database = btree:${data_directory}/smtpd_scache smtp_tls_session_cache_database = btree:${data_directory}/smtp_scache # See /usr/share/doc/postfix/TLS_README.gz in the postfix-doc package for # information on enabling SSL in the smtp client. smtpd_relay_restrictions = permit_mynetworks permit_sasl_authenticated defer_unauth_destination myhostname = <FQDN> alias_maps = hash:/etc/aliases alias_database = hash:/etc/aliases myorigin = /etc/mailname mydestination = $myhostname, <FQDN>, localhost.<domínio>, , localhost relayhost = mynetworks = 127.0.0.0/8 [::ffff:127.0.0.0]/104 [::1]/128 mailbox_size_limit = 0 recipient_delimiter = + inet_interfaces = all inet_protocols = all - Editar o arquivo
/etc/aliasese adicionar a linha abaixo, substituindo<E-MAIL-PARA-RECEBER-ALERTAS-DESSE-SERVIDOR>pelo e-mail ou lista de e-mails separados por vírgula, de quem irá receber os alertas enviados pelo servidor.root:
<E-MAIL-PARA-RECEBER-ALERTAS-DESSE-SERVIDOR> - Gerar novo banco de dados de aliases com o comando:
# newaliases
- Testar o envio de e-mail com o comando:
# date | mail -s "Teste de envio do $(hostname)" root
2.5.2. Instalação do cron-apt
O cron-apt é um serviço que enviará um
e-mail ao administrador do servidor sempre que houver uma
atualização de pacotes disponível.
- Instalar o
cron-aptcom o comando:# apt install cron-apt -qy
- Configurar o
cron-aptpara enviar e-mail ao administrador do servidor editando o arquivo/etc/cron-apt/confige adicionando o seguinte conteúdo:MAILTO="root" MAILON="upgrade" OPTIONS="-o Acquire::http::Dl-Limit=125" ### EOF
- Reiniciar o serviço de
croncom o comando:# systemctl restart cron
3. Instalação do MariaDB, Apache, PHP e outras Dependências do MISP
Essa seção aborda a instalação, configuração e hardening do MariaDB, Apache, PHP e outras dependências do MISP.
3.1. Instalar e fazer o hardening do MariaDB
- Instalar o
MariaDBcom o seguinte comando:# apt install mariadb-client mariadb-server -qy
- Fazer o hardening do
MariaDBrodando o comandomysql_secure_installation:
Quando solicitada a senha deroot, pressione<enter>pois ainda não existe senha.# mysql_secure_installation NOTE: RUNNING ALL PARTS OF THIS SCRIPT IS RECOMMENDED FOR ALL MariaDB SERVERS IN PRODUCTION USE! PLEASE READ EACH STEP CAREFULLY! In order to log into MariaDB to secure it, we'll need the current password for the root user. If you've just installed MariaDB, and haven't set the root password yet, you should just press enter here. Enter current password for root (enter for none): OK, successfully used password, moving on...Em seguida pressionenpara não utilizar autenticação viaunix_socket:Setting the root password or using the unix_socket ensures that nobody can log into the MariaDB root user without the proper authorisation. You already have your root account protected, so you can safely answer 'n'. Switch to unix_socket authentication [Y/n]
E a seguir pressione<enter>para alterar a senha doroote, em seguida, digite a senha em"New password"e confirme em"Re-enter new password".
Substitua<MYSQL-ROOT-PASSWORD>por uma senha forte. Sugerimos grar a senha utilizando o seguinte comando:
# openssl rand -base64 15Change the root password? [Y/n] New password:
Para as demais opções, apenas pressione<MYSQL-ROOT-PASSWORD>Re-enter new password:<MYSQL-ROOT-PASSWORD>Password updated successfully! Reloading privilege tables.. ... Success!<enter>:By default, a MariaDB installation has an anonymous user, allowing anyone to log into MariaDB without having to have a user account created for them. This is intended only for testing, and to make the installation go a bit smoother. You should remove them before moving into a production environment. Remove anonymous users? [Y/n] ... Success! Normally, root should only be allowed to connect from 'localhost'. This ensures that someone cannot guess at the root password from the network. Disallow root login remotely? [Y/n] ... Success! By default, MariaDB comes with a database named 'test' that anyone can access. This is also intended only for testing, and should be removed before moving into a production environment. Remove test database and access to it? [Y/n] - Dropping test database... ... Success! - Removing privileges on test database... ... Success! Reloading the privilege tables will ensure that all changes made so far will take effect immediately. Reload privilege tables now? [Y/n] ... Success! Cleaning up... All done! If you've completed all of the above steps, your MariaDB installation should now be secure. Thanks for using MariaDB
- Checar se o
MariaDBestá rodando com o comando:# systemctl status mariadb ● mariadb.service - MariaDB 10.11.13 database server Loaded: loaded (/usr/lib/systemd/system/mariadb.service; enabled; preset: enabled) Active: active (running) since Mon 2025-08-04 14:17:39 UTC; 3min 29s ago Docs: man:mariadbd(8) https://mariadb.com/kb/en/library/systemd/ Main PID: 12863 (mariadbd) Status: "Taking your SQL requests now..." Tasks: 10 (limit: 6952) Memory: 79.2M (peak: 82.0M) CPU: 634ms CGroup: /system.slice/mariadb.service └─12863 /usr/sbin/mariadbd Aug 04 14:17:39 misp-server mariadbd[12863]: 2025-08-04 14:17:39 0 [Note] Server socket created on IP: '127.0.0.1'. Aug 04 14:17:39 misp-server mariadbd[12863]: 2025-08-04 14:17:39 0 [Note] InnoDB: Buffer pool(s) load completed at 250804 14:17:39 Aug 04 14:17:39 misp-server mariadbd[12863]: 2025-08-04 14:17:39 0 [Note] /usr/sbin/mariadbd: ready for connections. Aug 04 14:17:39 misp-server mariadbd[12863]: Version: '10.11.13-MariaDB-0ubuntu0.24.04.1' socket: '/run/mysqld/mysqld.sock' port: 3306 Ubuntu 24.04 Aug 04 14:17:39 misp-server systemd[1]: Started mariadb.service - MariaDB 10.11.13 database server. Aug 04 14:17:39 misp-server /etc/mysql/debian-start[12882]: Upgrading MariaDB tables if necessary. Aug 04 14:17:39 misp-server /etc/mysql/debian-start[12893]: Checking for insecure root accounts. Aug 04 14:17:39 misp-server /etc/mysql/debian-start[12897]: Triggering myisam-recover for all MyISAM tables and aria-recover for all Aria tables - Otimizações para o
MariaDB:
IMPORTANTE: As otimizaçcões mostradas a seguir podem melhorar o rendimento do banco de dados, mas se feitas de forma incorreta, podem piorar a performance do sistema como um todo.
Editar o arquivo/etc/mysql/mariadb.conf.d/50-server.cnf
Procurar porinnodb_buffer_pool_sizee adicionar as seguintes linhas:innodb_buffer_pool_size = valor innodb_io_capacity = valor innodb_read_io_threads = valor
Ajustar os valores conforme seu ambiente.
Para visualizar os valores padões definidos em seu sistema, rode o seguinte comando logado comorootno banco de dados:MariaDB [(none)]> SELECT @@innodb_io_capacity, @@innodb_read_io_threads, @@innodb_buffer_pool_size; +----------------------+--------------------------+---------------------------+ | @@innodb_io_capacity | @@innodb_read_io_threads | @@innodb_buffer_pool_size | +----------------------+--------------------------+---------------------------+ | 200 | 4 | 134217728 | +----------------------+--------------------------+---------------------------+ 1 row in set (0.000 sec)
3.2. Instalar o Apache
- Instalar o servidor
apachecom o comando:# apt install apache2 apache2-doc apache2-utils -qy
- Editar o arquivo
/etc/apache2/sites-available/000-default.conf, descomentar a linha"ServerName"e preencher com seu FQDN. - Recarregar o arquivo de configuração do
apachecom o comando:# systemctl restart apache2
- Instalar e configurar o
certbot(opcional caso sua organização tenha um certificado próprio)
- Instalar o pacote
certbotcom o comando:# apt install certbot python3-certbot-apache -qy
- Criar o certificado com o comando
certbot certonly --apachee quando solicitado, digitar seu e-mail para receber alertas sobre seu certificado:# certbot certonly --apache Saving debug log to /var/log/letsencrypt/letsencrypt.log Enter email address (used for urgent renewal and security notices) (Enter 'c' to cancel):
Concordar com os termos de serviço pressionando a tecla Y:- - - - - - - - - - - - - - - - - - - - - - - - - - - - - - - - - - - - - - - - Please read the Terms of Service at https://letsencrypt.org/documents/LE-SA-v1.5-February-24-2025.pdf. You must agree in order to register with the ACME server. Do you agree? - - - - - - - - - - - - - - - - - - - - - - - - - - - - - - - - - - - - - - - - (Y)es/(N)o:
Escolher se quer ou não compartilhar seu e-mail com a EFF pressionando Y ou N:- - - - - - - - - - - - - - - - - - - - - - - - - - - - - - - - - - - - - - - - Would you be willing, once your first certificate is successfully issued, to share your email address with the Electronic Frontier Foundation, a founding partner of the Let's Encrypt project and the non-profit organization that develops Certbot? We'd like to send you email about our work encrypting the web, EFF news, campaigns, and ways to support digital freedom. - - - - - - - - - - - - - - - - - - - - - - - - - - - - - - - - - - - - - - - - (Y)es/(N)o:
Verificar se seu FQDN aparece na opção 1.
Se seu FQDN não aparecer, pressionar a tecla"c"e pressionar<enter>. Conferir no arquivo/etc/apache2/sites-available/000-default.confse a diretivaServerNameestá descomentada e com o seu FQDN.Which names would you like to activate HTTPS for? - - - - - - - - - - - - - - - - - - - - - - - - - - - - - - - - - - - - - - - - 1:
<SEU-FQDN>- - - - - - - - - - - - - - - - - - - - - - - - - - - - - - - - - - - - - - - - Select the appropriate numbers separated by commas and/or spaces, or leave input blank to select all options shown (Enter 'c' to cancel): 1 Requesting a certificate for <seu FQDN> Successfully received certificate. Certificate is saved at: /etc/letsencrypt/live/<SEU-FQDN>/fullchain.pem Key is saved at: /etc/letsencrypt/live/<SEU-FQDN>/privkey.pem This certificate expires on 2024-09-22. These files will be updated when the certificate renews. Certbot has set up a scheduled task to automatically renew this certificate in the background. - - - - - - - - - - - - - - - - - - - - - - - - - - - - - - - - - - - - - - - - If you like Certbot, please consider supporting our work by: * Donating to ISRG / Let's Encrypt: https://letsencrypt.org/donate * Donating to EFF: https://eff.org/donate-le - - - - - - - - - - - - - - - - - - - - - - - - - - - - - - - - - - - - - - - - - Testar se a renovação do certificado está funcionando com o comando:
# certbot renew --dry-run Saving debug log to /var/log/letsencrypt/letsencrypt.log - - - - - - - - - - - - - - - - - - - - - - - - - - - - - - - - - - - - - - - - Processing /etc/letsencrypt/renewal/
<SEU-FQDN>.conf - - - - - - - - - - - - - - - - - - - - - - - - - - - - - - - - - - - - - - - - Account registered. Simulating renewal of an existing certificate for <seu FQDN> - - - - - - - - - - - - - - - - - - - - - - - - - - - - - - - - - - - - - - - - Congratulations, all simulated renewals succeeded: /etc/letsencrypt/live/<SEU-FQDN>/fullchain.pem (success) - - - - - - - - - - - - - - - - - - - - - - - - - - - - - - - - - - - - - - - -
- Instalar o pacote
3.3. Instalar o PHP 8.3
- Instalar o
phpe os módulos utilizados pelo MISP com o comando:# apt install php8.3 php8.3-cli php8.3-dev php8.3-xml \ php8.3-mysql php8.3-opcache php8.3-readline php8.3-mbstring php8.3-zip \ php8.3-intl php8.3-bcmath php8.3-gd php8.3-redis php8.3-gnupg php8.3-apcu \ libapache2-mod-php8.3 php8.3-curl -qy
- Configurar o
phpeditando o arquivo/etc/php/8.3/apache2/php.ini:
Editar o arquivo/etc/php/8.3/apache2/php.inie colocar os seguintes valores:
upload_max_filesize = 50M
post_max_size = 50M
max_execution_time = 300
memory_limit = 2048M
session.sid_length = 32
session.use_strict_mode = 1
Ou executar os comandos a seguir:# sed -i 's/^\(upload_max_filesize\) = .*$/\1 = 50M/g' /etc/php/8.3/apache2/php.ini # sed -i 's/^\(post_max_size\) = .*$/\1 = 50M/g' /etc/php/8.3/apache2/php.ini # sed -i 's/^\(max_execution_time\) = .*$/\1 = 300/g' /etc/php/8.3/apache2/php.ini # sed -i 's/^\(memory_limit\) = .*$/\1 = 2048M/g' /etc/php/8.3/apache2/php.ini # sed -i 's/^\(session\.sid_length\) = .*$/\1 = 32/g' /etc/php/8.3/apache2/php.ini # sed -i 's/^\(session\.use_strict_mode\) = .*$/\1 = 1/g' /etc/php/8.3/apache2/php.ini
Verificar também se as diretivasexpose_phpedisplay_errorsestão desligadas:expose_php = Off display_errors = Off
- Instalar e habilitar outros módulos
phpcom os comandos:# pecl channel-update pecl.php.net # pecl install brotli # pecl install simdjson # pecl install zstd # echo "extension=brotli.so" | tee /etc/php/8.3/mods-available/brotli.ini # echo "extension=simdjson.so" | tee /etc/php/8.3/mods-available/simdjson.ini # echo "extension=zstd.so" | tee /etc/php/8.3/mods-available/zstd.ini # phpenmod -v 8.3 -s ALL brotli # phpenmod -v 8.3 -s ALL simdjson # phpenmod -v 8.3 -s ALL zstd
Recarregar oapachecom o comando:# systemctl reload apache2
- Testar o php criando o
arquivo
/var/www/html/phpinfo.phpcom o seguinte conteúdo:<?php phpinfo() ?>
- Acessar
http://<SEU-FQDN>/phpinfo.phpe verificar se o php está funcionando. - Após o teste, remover o
arquivo
phpinfo.phpcom o comando:# rm /var/www/html/phpinfo.php
3.4. Instalar o Redis
- Instalar o
rediscom o comando:# apt install redis-server -qy
- Criar a senha do
rediscom o comando:# openssl rand -base64 24
- Configurar o
redispara utilizar senha.
Editar o arquivo/etc/redis/redis.confe localizar a seguinte linha:# requirepass foobared
Substituir<REDIS-PASSWORD>pela senha gerada no passo 2:requirepass
<REDIS-PASSWORD> - Reiniciar o
rediscom o comando:# systemctl restart redis
3.5. Instalar as dependências do MISP
- Instalar as dependências do MISP com o comando:
# apt install git curl python3 python3-pip python3-virtualenv zip gcc \
sudo binutils openssl supervisor libfuzzy-dev -qy
- Criar as variáveis de ambiente com os comandos:
# export PATH_TO_MISP=/var/www/MISP
# export WWW_USER=www-data
# export SUDO_WWW='sudo -H -u www-data'
- Verificar se as variáveis foram criadas com o comando:
# env
- Instalar o
composercom os comandos:# mkdir /var/www/.cache/ # chown -R ${WWW_USER}:${WWW_USER} /var/www/.cache/ # curl -sS https://getcomposer.org/installer -o /tmp/composer-setup.php # php /tmp/composer-setup.php --install-dir=/usr/local/bin --filename=composer
4. Instalação do MISP
Essa seção aborda a instalação do MISP, criação do banco de dados e configuração do site.
4.1. Instalar o código do MISP
- Criar o diretório onde o MISP será instalado:
# mkdir ${PATH_TO_MISP} # chown ${WWW_USER}:${WWW_USER} ${PATH_TO_MISP} - Baixar o código do MISP e seus submódulos com os comandos:
# cd ${PATH_TO_MISP} # ${SUDO_WWW} git clone https://github.com/MISP/MISP.git ${PATH_TO_MISP} # ${SUDO_WWW} git fetch origin 2.5 # ${SUDO_WWW} git checkout 2.5 # git config --global --add safe.directory ${PATH_TO_MISP} # ${SUDO_WWW} git -C ${PATH_TO_MISP} submodule update --init --recursive # ${SUDO_WWW} git -C ${PATH_TO_MISP} submodule foreach --recursive git config core.filemode false - Instalar as dependências do
composerpara o MISP com os comandos:# cd ${PATH_TO_MISP}/app # ${SUDO_WWW} composer install --no-dev --no-interaction --prefer-dist
4.2. Instalar o PyMISP
- Criar o
virtualenvdopython:# ${SUDO_WWW} virtualenv -p python3 ${PATH_TO_MISP}/venv - Instalar o
PyMISPe outras dependências com os comandos:# cd ${PATH_TO_MISP} # . ./venv/bin/activate # ${PATH_TO_MISP}/venv/bin/pip install -r ${PATH_TO_MISP}/requirements.txt # deactivate
4.3. Criar o banco de dados do MISP
- Criar uma senha forte para ser utilizada pelo usuário do MISP
no banco de dados.
Sugerimos utilizar o seguinte comando:# openssl rand -base64 15
- Acessar o
mariadbcomoroot:# mysql -u root -p
- Digitar os seguintes comandos para criar o banco de dados do MISP
e o usuário que terá acesso ao banco, substituindo
<MISP_USER-PASSWORD>pela senha gerada no passo 1:CREATE DATABASE misp; CREATE USER 'misp_user'@'localhost' IDENTIFIED BY '
<MISP_USER-PASSWORD>'; GRANT USAGE ON *.* to misp_user@localhost; GRANT ALL PRIVILEGES on misp.* to 'misp_user'@'localhost'; FLUSH PRIVILEGES; exit - Importar o esquema do banco de dados do MISP:
# mysql -u misp_user misp -p < ${PATH_TO_MISP}/INSTALL/MYSQL.sql
4.4. Corrigir as permissões
- Para garantir que nenhuma permissão foi definida da forma errada, corrija todas as permissões do diretório de instalação do MISP com os comandos:
# chown -R ${WWW_USER}:${WWW_USER} ${PATH_TO_MISP}
# chmod -R 750 ${PATH_TO_MISP}
# chmod -R g+ws ${PATH_TO_MISP}/app/tmp
# chmod -R g+ws ${PATH_TO_MISP}/app/files
4.5. Configurar o site do MISP
Essas configurações garantem nota A+ no teste de TLS no Qualys SSL Labs (https://www.ssllabs.com/ssltest/) e um hardening mínimo no Apache removendo os detalhes excessivos de sua assinatura.
- Criar o arquivo
/etc/apache2/sites-available/misp-ssl.confcom o seguinte conteúdo, substituindo<SEU-FQDN>pelo FQDN do seu servidor MISP:<VirtualHost *:80> ServerName<SEU-FQDN>Redirect permanent / https://<SEU-FQDN>LogLevel warn ErrorLog /var/log/apache2/misp.local_error.log CustomLog /var/log/apache2/misp.local_access.log combined ServerSignature Off </VirtualHost> <VirtualHost *:443> ServerAdmin admin@<SEU-FQDN>ServerName<SEU-FQDN>DocumentRoot /var/www/MISP/app/webroot <Directory /var/www/MISP/app/webroot> Options -Indexes AllowOverride all Order allow,deny allow from all </Directory> SSLEngine On SSLCertificateFile /etc/letsencrypt/live/<SEU-FQDN>/fullchain.pem SSLCertificateKeyFile /etc/letsencrypt/live/<SEU-FQDN>/privkey.pem LogLevel warn ErrorLog /var/log/apache2/misp.local_error.log CustomLog /var/log/apache2/misp.local_access.log combined ServerSignature Off Header always set Strict-Transport-Security "max-age=63072000" </VirtualHost> ServerTokens Prod SSLProtocol all -SSLv3 -TLSv1 -TLSv1.1 SSLCipherSuite ECDHE-ECDSA-AES128-GCM-SHA256:ECDHE-RSA-AES128-GCM-SHA256:ECDHE-ECDSA-AES256-GCM-SHA384:ECDHE-RSA-AES256-GCM-SHA384:ECDHE-ECDSA-CHACHA20-POLY1305:ECDHE-RSA-CHACHA20-POLY1305:DHE-RSA-AES128-GCM-SHA256:DHE-RSA-AES256-GCM-SHA384 SSLHonorCipherOrder off SSLSessionTickets off SSLUseStapling On SSLStaplingCache "shmcb:logs/ssl_stapling(32768)" - Verificar se o arquivo de configuração está correto com o comando:
# apache2ctl configtest
- Desabilitar o módulo
statusdoapachecom o comando:# a2dismod status
- Habilitar os módulos
rewriteeheaders:# a2enmod ssl # a2enmod rewrite # a2enmod headers
- Desabilitar o site padrão do
apachee habilitar o site do MISP:# a2dissite 000-default # a2ensite misp-ssl
- Reiniciar o
apachecom o comando:# systemctl restart apache2
4.6. Habilitar os workers
- Gerar a senha do usuário
supervisorcom o seguinte comando:# openssl rand -base64 15
- Configurar o
supervisoradicionando ao final do arquivo/etc/supervisor/supervisord.confas seguintes linhas, substituindo<SUPERVISOR-PASSWORD>pela senha gerada no passo 1:[inet_http_server] port=127.0.0.1:9001 username=supervisor password=
<SUPERVISOR-PASSWORD> - Criar o arquivo de configuração do
serviço do misp editando o arquivo
/etc/supervisor/conf.d/misp-workers.confcom o seguinte conteúdo:[group:misp-workers] programs=default,email,cache,prio,update,scheduler [program:default] directory=/var/www/MISP command=/var/www/MISP/app/Console/cake start_worker default process_name=%(program_name)s_%(process_num)02d numprocs=5 autostart=true autorestart=true redirect_stderr=false stderr_logfile=/var/www/MISP/app/tmp/logs/misp-workers-errors.log stdout_logfile=/var/www/MISP/app/tmp/logs/misp-workers.log directory=/var/www/MISP user=www-data [program:prio] directory=/var/www/MISP command=/var/www/MISP/app/Console/cake start_worker prio process_name=%(program_name)s_%(process_num)02d numprocs=5 autostart=true autorestart=true redirect_stderr=false stderr_logfile=/var/www/MISP/app/tmp/logs/misp-workers-errors.log stdout_logfile=/var/www/MISP/app/tmp/logs/misp-workers.log directory=/var/www/MISP user=www-data [program:email] directory=/var/www/MISP command=/var/www/MISP/app/Console/cake start_worker email process_name=%(program_name)s_%(process_num)02d numprocs=5 autostart=true autorestart=true redirect_stderr=false stderr_logfile=/var/www/MISP/app/tmp/logs/misp-workers-errors.log stdout_logfile=/var/www/MISP/app/tmp/logs/misp-workers.log directory=/var/www/MISP user=www-data [program:update] directory=/var/www/MISP command=/var/www/MISP/app/Console/cake start_worker update process_name=%(program_name)s_%(process_num)02d numprocs=1 autostart=true autorestart=true redirect_stderr=false stderr_logfile=/var/www/MISP/app/tmp/logs/misp-workers-errors.log stdout_logfile=/var/www/MISP/app/tmp/logs/misp-workers.log directory=/var/www/MISP user=www-data [program:cache] directory=/var/www/MISP command=/var/www/MISP/app/Console/cake start_worker cache process_name=%(program_name)s_%(process_num)02d numprocs=5 autostart=true autorestart=true redirect_stderr=false stderr_logfile=/var/www/MISP/app/tmp/logs/misp-workers-errors.log stdout_logfile=/var/www/MISP/app/tmp/logs/misp-workers.log user=www-data [program:scheduler] directory=/var/www/MISP command=/var/www/MISP/app/Console/cake scheduler_worker process_name=%(program_name)s_%(process_num)02d numprocs=1 autostart=true autorestart=true redirect_stderr=false stderr_logfile=/var/www/MISP/app/tmp/logs/misp-workers-errors.log stdout_logfile=/var/www/MISP/app/tmp/logs/misp-workers.log user=www-data
4.7. Habilitar a rotação de logs do MISP
- Habilitar a rotação de logs do MISP com os comandos:
# cp ${PATH_TO_MISP}/INSTALL/misp.logrotate /etc/logrotate.d/misp
# chmod 0640 /etc/logrotate.d/misp
5. Configuração do MISP
Essa seção aborda as configurações iniciais do MISP.
5.1. Criar os arquivos de configuração e definir as credenciais de acesso
- Criar os arquivos de configuração copiando os arquivos default fornecidos pelo MISP:
# ${SUDO_WWW} cp -a ${PATH_TO_MISP}/app/Config/bootstrap.default.php ${PATH_TO_MISP}/app/Config/bootstrap.php # ${SUDO_WWW} cp -a ${PATH_TO_MISP}/app/Config/database.default.php ${PATH_TO_MISP}/app/Config/database.php # ${SUDO_WWW} cp -a ${PATH_TO_MISP}/app/Config/core.default.php ${PATH_TO_MISP}/app/Config/core.php # ${SUDO_WWW} cp -a ${PATH_TO_MISP}/app/Config/config.default.php ${PATH_TO_MISP}/app/Config/config.php - Editar o arquivo
database.phpe configurar as linhas referentes às credenciais de acesso ao banco de dados do MISP.
Usuário e senha foram criados no passo 2 da Seção 4.3 Criar o banco de dados do MISP.# ${SUDO_WWW} vi $PATH_TO_MISP/app/Config/database.php- Localizar a linha:
'login' => 'db login',
Substituir pelo usuário criado para acessar o banco de dados do misp:'login' => 'misp_user',
- Localizar a linha:
'password' => 'db password',
Substituir<MISP_USER-PASSWORD>pela senha do usuáriomisp_user'password' => '
<MISP_USER-PASSWORD>', - Localizar a linha
databasee verificar se aponta para o banco de dados'misp':'database' => 'misp',
- Localizar a linha:
- Editar o arquivo
config.phppara configurar o novosalt.IMPORTANTE: Altere o
saltantes de fazer o primeiro login no MISP.
Caso você esqueça de fazer este passo, será necessário remover o usuárioadmin@admin.testdo banco de dados e logar novamente no sistema com as credenciais default (usuario:admin@admin.testsenha:admin).
Osaltdeve ser uma string de pelo menos 32 bits.Uma sugestão para a criação da string para o
salté utilizar o comando:# openssl rand -base64 24
Editar o arquivoconfig.php:# ${SUDO_WWW} vi $PATH_TO_MISP/app/Config/config.phpLocalizar a seguinte linha:'salt' => '',
Colocar a nova string dosalt(gerada acima) no lugar do campo vazio:
'salt' => '
<NOVA-STRING-DE-SALT>', - Definir as permissões corretas nos arquivos de configuração com os comandos:
# chown -R ${WWW_USER}:${WWW_USER} ${PATH_TO_MISP}/app/Config
# chmod -R 750 ${PATH_TO_MISP}/app/Config
5.2. Configurar o redis e os background workers do MISP
- Configurar o
redis, substituindo<REDIS-PASSWORDd>pela senha criada no passo 2 da Seção 3.4. Instalação do Redis:# ${SUDO_WWW} ${PATH_TO_MISP}/app/Console/cake Admin setSetting "MISP.redis_host" "127.0.0.1" # ${SUDO_WWW} ${PATH_TO_MISP}/app/Console/cake Admin setSetting "MISP.redis_port" 6379 # ${SUDO_WWW} ${PATH_TO_MISP}/app/Console/cake Admin setSetting "MISP.redis_database" 13 # ${SUDO_WWW} ${PATH_TO_MISP}/app/Console/cake Admin setSetting "MISP.redis_password" "<REDIS-PASSWORDd>" - Configurar os
background workers, substituindo<REDIS-PASSWORD>pela senha criada no passo 2 da Seção 3.4. Instalação do Redis e<SUPERVISOR_PASSWORDd>pela senha criada no passo 1 da Seção 4.6. Habilitar os workers:# ${SUDO_WWW} ${PATH_TO_MISP}/app/Console/cake Admin setSetting "SimpleBackgroundJobs.enabled" 1 # ${SUDO_WWW} ${PATH_TO_MISP}/app/Console/cake Admin setSetting "SimpleBackgroundJobs.redis_host" '127.0.0.1' # ${SUDO_WWW} ${PATH_TO_MISP}/app/Console/cake Admin setSetting "SimpleBackgroundJobs.redis_port" 6379 # ${SUDO_WWW} ${PATH_TO_MISP}/app/Console/cake Admin setSetting "SimpleBackgroundJobs.redis_database" 13 # ${SUDO_WWW} ${PATH_TO_MISP}/app/Console/cake Admin setSetting "SimpleBackgroundJobs.redis_password" "<REDIS-PASSWORDd>" # ${SUDO_WWW} ${PATH_TO_MISP}/app/Console/cake Admin setSetting "SimpleBackgroundJobs.redis_namespace" "background_jobs" # ${SUDO_WWW} ${PATH_TO_MISP}/app/Console/cake Admin setSetting "SimpleBackgroundJobs.supervisor_host" "localhost" # ${SUDO_WWW} ${PATH_TO_MISP}/app/Console/cake Admin setSetting "SimpleBackgroundJobs.supervisor_port" 9001 # ${SUDO_WWW} ${PATH_TO_MISP}/app/Console/cake Admin setSetting "SimpleBackgroundJobs.supervisor_user" supervisor # ${SUDO_WWW} ${PATH_TO_MISP}/app/Console/cake Admin setSetting "SimpleBackgroundJobs.supervisor_password" "<SUPERVISOR-PASSWORD>" - Reiniciar o
supervisorpara iniciar osbackground workerscom o comando:# systemctl restart supervisor
- Finalizar a configuração dos
background workerscom o comando:# ${SUDO_WWW} ${PATH_TO_MISP}/app/Console/cake Admin setSetting "SimpleBackgroundJobs.redis_serializer" "JSON"
5.3. Definir as configurações iniciais do MISP
- Inicializar o MISP e atualizar o banco de dados:
# ${SUDO_WWW} ${PATH_TO_MISP}/app/Console/cake user init -q # ${SUDO_WWW} ${PATH_TO_MISP}/app/Console/cake Admin runUpdates - Definir o path para o
virtualenv:# ${SUDO_WWW} ${PATH_TO_MISP}/app/Console/cake Admin setSetting "MISP.python_bin" "${PATH_TO_MISP}/venv/bin/python" - Definir timeouts:
# ${SUDO_WWW} ${PATH_TO_MISP}/app/Console/cake Admin setSetting "Session.autoRegenerate" 0 # ${SUDO_WWW} ${PATH_TO_MISP}/app/Console/cake Admin setSetting "Session.timeout" 600 # ${SUDO_WWW} ${PATH_TO_MISP}/app/Console/cake Admin setSetting "Session.cookieTimeout" 3600 - Definir a URL do MISP, substituindo
<SEU-FQDN>pelo FQDN do seu servidor MISP:# ${SUDO_WWW} ${PATH_TO_MISP}/app/Console/cake admin setSetting MISP.baseurl https://<SEU-FQDN># ${SUDO_WWW} ${PATH_TO_MISP}/app/Console/cake Admin setSetting "MISP.external_baseurl" https://<SEU-FQDN> - Habilitar a organização padrão e configurar algumas variáveis,
substituindo
<MISP-EMAIL>pelo e-mail que será utilizado no MISP:# ${SUDO_WWW} ${PATH_TO_MISP}/app/Console/cake Admin setSetting "MISP.host_org_id" 1 # ${SUDO_WWW} ${PATH_TO_MISP}/app/Console/cake Admin setSetting "MISP.email" "<MISP-EMAIL>" # ${SUDO_WWW} ${PATH_TO_MISP}/app/Console/cake Admin setSetting --force "MISP.disable_emailing" true # ${SUDO_WWW} ${PATH_TO_MISP}/app/Console/cake Admin setSetting "MISP.contact" "<MISP-EMAIL>" # ${SUDO_WWW} ${PATH_TO_MISP}/app/Console/cake Admin setSetting "MISP.disablerestalert" true # ${SUDO_WWW} ${PATH_TO_MISP}/app/Console/cake Admin setSetting "MISP.showCorrelationsOnIndex" true # ${SUDO_WWW} ${PATH_TO_MISP}/app/Console/cake Admin setSetting "MISP.default_event_tag_collection" 0 # ${SUDO_WWW} ${PATH_TO_MISP}/app/Console/cake Admin setSetting "MISP.log_new_audit" 1 - hardening do MISP:
# ${SUDO_WWW} ${PATH_TO_MISP}/app/Console/cake Admin setSetting "Security.disable_browser_cache" true # ${SUDO_WWW} ${PATH_TO_MISP}/app/Console/cake Admin setSetting "Security.check_sec_fetch_site_header" true # ${SUDO_WWW} ${PATH_TO_MISP}/app/Console/cake Admin setSetting "Security.csp_enforce" true # ${SUDO_WWW} ${PATH_TO_MISP}/app/Console/cake Admin setSetting "Security.advanced_authkeys" true # ${SUDO_WWW} ${PATH_TO_MISP}/app/Console/cake Admin setSetting "Security.do_not_log_authkeys" true # ${SUDO_WWW} ${PATH_TO_MISP}/app/Console/cake Admin setSetting "Security.username_in_response_header" true - Adicionar endereço IP nos logs:
# ${SUDO_WWW} ${PATH_TO_MISP}/app/Console/cake Admin setSetting "MISP.log_client_ip" true # ${SUDO_WWW} ${PATH_TO_MISP}/app/Console/cake Admin setSetting "MISP.log_auth" true - Atualizar galáxias, taxonomias e outros objetos:
# ${SUDO_WWW} ${PATH_TO_MISP}/app/Console/cake Admin updateGalaxies # ${SUDO_WWW} ${PATH_TO_MISP}/app/Console/cake Admin updateTaxonomies # ${SUDO_WWW} ${PATH_TO_MISP}/app/Console/cake Admin updateWarningLists # ${SUDO_WWW} ${PATH_TO_MISP}/app/Console/cake Admin updateNoticeLists # ${SUDO_WWW} ${PATH_TO_MISP}/app/Console/cake Admin updateObjectTemplates "1" - Personalizar o MISP, substituindo
<SUA-ORG>pelo nome da sua organização:# ${SUDO_WWW} ${PATH_TO_MISP}/app/Console/cake Admin setSetting "MISP.footermidleft" "" --force # ${SUDO_WWW} ${PATH_TO_MISP}/app/Console/cake Admin setSetting "MISP.footermidright" "Operated by<SUA-ORG>" # ${SUDO_WWW} ${PATH_TO_MISP}/app/Console/cake Admin setSetting "MISP.welcome_text_top" "<SUA-ORG>" # ${SUDO_WWW} ${PATH_TO_MISP}/app/Console/cake Admin setSetting "MISP.welcome_text_bottom" "" --force - Configurar opções default:
# ${SUDO_WWW} ${PATH_TO_MISP}/app/Console/cake Admin setSetting "MISP.language" "eng" # ${SUDO_WWW} ${PATH_TO_MISP}/app/Console/cake Admin setSetting "MISP.proposals_block_attributes" false # ${SUDO_WWW} ${PATH_TO_MISP}/app/Console/cake Admin setSetting "MISP.tmpdir" "${PATH_TO_MISP}/app/tmp" # ${SUDO_WWW} ${PATH_TO_MISP}/app/Console/cake Admin setSetting "MISP.attachments_dir" "${PATH_TO_MISP}/app/files" # ${SUDO_WWW} ${PATH_TO_MISP}/app/Console/cake Admin setSetting "MISP.ssdeep_correlation_threshold" 40 # ${SUDO_WWW} ${PATH_TO_MISP}/app/Console/cake Admin setSetting "MISP.extended_alert_subject" false # ${SUDO_WWW} ${PATH_TO_MISP}/app/Console/cake Admin setSetting "MISP.default_event_threat_level" 4 # ${SUDO_WWW} ${PATH_TO_MISP}/app/Console/cake Admin setSetting "MISP.newUserText" "Dear new MISP user,\\n\\nWe would hereby like to welcome you to the \$org MISP community.\\n\\n Use the credentials below to log into MISP at \$misp, where you will be prompted to manually change your password to something of your own choice.\\n\\nUsername: \$username\\nPassword: \$password\\n\\nIf you have any questions, don't hesitate to contact us at: \$contact.\\n\\nBest regards,\\nYour \$org MISP support team" # ${SUDO_WWW} ${PATH_TO_MISP}/app/Console/cake Admin setSetting "MISP.passwordResetText" "Dear MISP user,\\n\\nA password reset has been triggered for your account. Use the below provided temporary password to log into MISP at \$misp, where you will be prompted to manually change your password to something of your own choice.\\n\\nUsername: \$username\\nYour temporary password: \$password\\n\\nIf you have any questions, don't hesitate to contact us at: \$contact.\\n\\nBest regards,\\nYour \$org MISP support team" # ${SUDO_WWW} ${PATH_TO_MISP}/app/Console/cake Admin setSetting "MISP.disableUserSelfManagement" false # ${SUDO_WWW} ${PATH_TO_MISP}/app/Console/cake Admin setSetting "MISP.block_event_alert" false # ${SUDO_WWW} ${PATH_TO_MISP}/app/Console/cake Admin setSetting "MISP.block_event_alert_tag" "no-alerts=\"true\"" # ${SUDO_WWW} ${PATH_TO_MISP}/app/Console/cake Admin setSetting "MISP.block_old_event_alert" false # ${SUDO_WWW} ${PATH_TO_MISP}/app/Console/cake Admin setSetting "MISP.incoming_tags_disabled_by_default" false # ${SUDO_WWW} ${PATH_TO_MISP}/app/Console/cake Admin setSetting "MISP.maintenance_message" "Great things are happening! MISP is undergoing maintenance, but will return shortly. You can contact the administration at \$email." # ${SUDO_WWW} ${PATH_TO_MISP}/app/Console/cake Admin setSetting "MISP.download_attachments_on_load" true # ${SUDO_WWW} ${PATH_TO_MISP}/app/Console/cake Admin setSetting "MISP.title_text" "MISP" # ${SUDO_WWW} ${PATH_TO_MISP}/app/Console/cake Admin setSetting "MISP.terms_download" false # ${SUDO_WWW} ${PATH_TO_MISP}/app/Console/cake Admin setSetting "MISP.showorgalternate" false # ${SUDO_WWW} ${PATH_TO_MISP}/app/Console/cake Admin setSetting "MISP.event_view_filter_fields" "id, uuid, value, comment, type, category, Tag.name" # ${SUDO_WWW} ${PATH_TO_MISP}/app/Console/cake Admin setSetting "Security.password_policy_length" 12 # ${SUDO_WWW} ${PATH_TO_MISP}/app/Console/cake Admin setSetting "Security.password_policy_complexity" '/^((?=.*\d)|(?=.*\W+))(?![\n])(?=.*[A-Z])(?=.*[a-z]).*$|.{16,}/' - Configurar plugins, substituindo
<REDIS-PASSWORDd>pela senha criada no passo 2 da Seção 3.4. Instalação do Redis:# ${SUDO_WWW} ${PATH_TO_MISP}/app/Console/cake Admin setSetting "Plugin.Cortex_services_enable" false # ${SUDO_WWW} ${PATH_TO_MISP}/app/Console/cake Admin setSetting "Plugin.Cortex_services_url" "http://127.0.0.1" # ${SUDO_WWW} ${PATH_TO_MISP}/app/Console/cake Admin setSetting "Plugin.Cortex_services_port" 9000 # ${SUDO_WWW} ${PATH_TO_MISP}/app/Console/cake Admin setSetting "Plugin.Cortex_timeout" 120 # ${SUDO_WWW} ${PATH_TO_MISP}/app/Console/cake Admin setSetting "Plugin.Cortex_authkey" "" --force # ${SUDO_WWW} ${PATH_TO_MISP}/app/Console/cake Admin setSetting "Plugin.Cortex_ssl_verify_peer" false # ${SUDO_WWW} ${PATH_TO_MISP}/app/Console/cake Admin setSetting "Plugin.Cortex_ssl_verify_host" false # ${SUDO_WWW} ${PATH_TO_MISP}/app/Console/cake Admin setSetting "Plugin.Cortex_ssl_allow_self_signed" true # ${SUDO_WWW} ${PATH_TO_MISP}/app/Console/cake Admin setSetting "Plugin.Sightings_policy" 0 # ${SUDO_WWW} ${PATH_TO_MISP}/app/Console/cake Admin setSetting "Plugin.Sightings_anonymise" false # ${SUDO_WWW} ${PATH_TO_MISP}/app/Console/cake Admin setSetting "Plugin.Sightings_range" 365 # ${SUDO_WWW} ${PATH_TO_MISP}/app/Console/cake Admin setSetting "Plugin.Sightings_sighting_db_enable" false # ${SUDO_WWW} ${PATH_TO_MISP}/app/Console/cake Admin setSetting "Plugin.CustomAuth_disable_logout" false # ${SUDO_WWW} ${PATH_TO_MISP}/app/Console/cake Admin setSetting "Plugin.RPZ_policy" "0" # ${SUDO_WWW} ${PATH_TO_MISP}/app/Console/cake Admin setSetting "Plugin.RPZ_walled_garden" "127.0.0.1" # ${SUDO_WWW} ${PATH_TO_MISP}/app/Console/cake Admin setSetting "Plugin.RPZ_serial" "\$date00" # ${SUDO_WWW} ${PATH_TO_MISP}/app/Console/cake Admin setSetting "Plugin.RPZ_refresh" "2h" # ${SUDO_WWW} ${PATH_TO_MISP}/app/Console/cake Admin setSetting "Plugin.RPZ_retry" "30m" # ${SUDO_WWW} ${PATH_TO_MISP}/app/Console/cake Admin setSetting "Plugin.RPZ_expiry" "30d" # ${SUDO_WWW} ${PATH_TO_MISP}/app/Console/cake Admin setSetting "Plugin.RPZ_minimum_ttl" "1h" # ${SUDO_WWW} ${PATH_TO_MISP}/app/Console/cake Admin setSetting "Plugin.RPZ_ttl" "1w" # ${SUDO_WWW} ${PATH_TO_MISP}/app/Console/cake Admin setSetting "Plugin.RPZ_ns" "localhost." # ${SUDO_WWW} ${PATH_TO_MISP}/app/Console/cake Admin setSetting --force "Plugin.RPZ_ns_alt" "" # ${SUDO_WWW} ${PATH_TO_MISP}/app/Console/cake Admin setSetting "Plugin.RPZ_email" "root.localhost" # ${SUDO_WWW} ${PATH_TO_MISP}/app/Console/cake Admin setSetting "Plugin.Kafka_enable" false # ${SUDO_WWW} ${PATH_TO_MISP}/app/Console/cake Admin setSetting "Plugin.Kafka_brokers" "kafka:9092" # ${SUDO_WWW} ${PATH_TO_MISP}/app/Console/cake Admin setSetting "Plugin.Kafka_rdkafka_config" "/etc/rdkafka.ini" # ${SUDO_WWW} ${PATH_TO_MISP}/app/Console/cake Admin setSetting "Plugin.Kafka_include_attachments" false # ${SUDO_WWW} ${PATH_TO_MISP}/app/Console/cake Admin setSetting "Plugin.Kafka_event_notifications_enable" false # ${SUDO_WWW} ${PATH_TO_MISP}/app/Console/cake Admin setSetting "Plugin.Kafka_event_notifications_topic" "misp_event" # ${SUDO_WWW} ${PATH_TO_MISP}/app/Console/cake Admin setSetting "Plugin.Kafka_event_publish_notifications_enable" false # ${SUDO_WWW} ${PATH_TO_MISP}/app/Console/cake Admin setSetting "Plugin.Kafka_event_publish_notifications_topic" "misp_event_publish" # ${SUDO_WWW} ${PATH_TO_MISP}/app/Console/cake Admin setSetting "Plugin.Kafka_object_notifications_enable" false # ${SUDO_WWW} ${PATH_TO_MISP}/app/Console/cake Admin setSetting "Plugin.Kafka_object_notifications_topic" "misp_object" # ${SUDO_WWW} ${PATH_TO_MISP}/app/Console/cake Admin setSetting "Plugin.Kafka_object_reference_notifications_enable" false # ${SUDO_WWW} ${PATH_TO_MISP}/app/Console/cake Admin setSetting "Plugin.Kafka_object_reference_notifications_topic" "misp_object_reference" # ${SUDO_WWW} ${PATH_TO_MISP}/app/Console/cake Admin setSetting "Plugin.Kafka_attribute_notifications_enable" false # ${SUDO_WWW} ${PATH_TO_MISP}/app/Console/cake Admin setSetting "Plugin.Kafka_attribute_notifications_topic" "misp_attribute" # ${SUDO_WWW} ${PATH_TO_MISP}/app/Console/cake Admin setSetting "Plugin.Kafka_shadow_attribute_notifications_enable" false # ${SUDO_WWW} ${PATH_TO_MISP}/app/Console/cake Admin setSetting "Plugin.Kafka_shadow_attribute_notifications_topic" "misp_shadow_attribute" # ${SUDO_WWW} ${PATH_TO_MISP}/app/Console/cake Admin setSetting "Plugin.Kafka_tag_notifications_enable" false # ${SUDO_WWW} ${PATH_TO_MISP}/app/Console/cake Admin setSetting "Plugin.Kafka_tag_notifications_topic" "misp_tag" # ${SUDO_WWW} ${PATH_TO_MISP}/app/Console/cake Admin setSetting "Plugin.Kafka_sighting_notifications_enable" false # ${SUDO_WWW} ${PATH_TO_MISP}/app/Console/cake Admin setSetting "Plugin.Kafka_sighting_notifications_topic" "misp_sighting" # ${SUDO_WWW} ${PATH_TO_MISP}/app/Console/cake Admin setSetting "Plugin.Kafka_user_notifications_enable" false # ${SUDO_WWW} ${PATH_TO_MISP}/app/Console/cake Admin setSetting "Plugin.Kafka_user_notifications_topic" "misp_user" # ${SUDO_WWW} ${PATH_TO_MISP}/app/Console/cake Admin setSetting "Plugin.Kafka_organisation_notifications_enable" false # ${SUDO_WWW} ${PATH_TO_MISP}/app/Console/cake Admin setSetting "Plugin.Kafka_organisation_notifications_topic" "misp_organisation" # ${SUDO_WWW} ${PATH_TO_MISP}/app/Console/cake Admin setSetting "Plugin.Kafka_audit_notifications_enable" false # ${SUDO_WWW} ${PATH_TO_MISP}/app/Console/cake Admin setSetting "Plugin.Kafka_audit_notifications_topic" "misp_audit" # ${SUDO_WWW} ${PATH_TO_MISP}/app/Console/cake Admin setSetting "Plugin.ZeroMQ_redis_password" "<REDIS-PASSWORDd>" # ${SUDO_WWW} ${PATH_TO_MISP}/app/Console/cake Admin setSetting "Plugin.ZeroMQ_enable" false # ${SUDO_WWW} ${PATH_TO_MISP}/app/Console/cake Admin setSetting "Plugin.ZeroMQ_host" "127.0.0.1" # ${SUDO_WWW} ${PATH_TO_MISP}/app/Console/cake Admin setSetting "Plugin.ZeroMQ_port" 50000 # ${SUDO_WWW} ${PATH_TO_MISP}/app/Console/cake Admin setSetting "Plugin.ZeroMQ_redis_host" "localhost" # ${SUDO_WWW} ${PATH_TO_MISP}/app/Console/cake Admin setSetting "Plugin.ZeroMQ_redis_port" 6379 # ${SUDO_WWW} ${PATH_TO_MISP}/app/Console/cake Admin setSetting "Plugin.ZeroMQ_redis_database" 1 # ${SUDO_WWW} ${PATH_TO_MISP}/app/Console/cake Admin setSetting "Plugin.ZeroMQ_redis_namespace" "mispq" # ${SUDO_WWW} ${PATH_TO_MISP}/app/Console/cake Admin setSetting "Plugin.ZeroMQ_event_notifications_enable" false # ${SUDO_WWW} ${PATH_TO_MISP}/app/Console/cake Admin setSetting "Plugin.ZeroMQ_object_notifications_enable" false # ${SUDO_WWW} ${PATH_TO_MISP}/app/Console/cake Admin setSetting "Plugin.ZeroMQ_object_reference_notifications_enable" false # ${SUDO_WWW} ${PATH_TO_MISP}/app/Console/cake Admin setSetting "Plugin.ZeroMQ_attribute_notifications_enable" false # ${SUDO_WWW} ${PATH_TO_MISP}/app/Console/cake Admin setSetting "Plugin.ZeroMQ_sighting_notifications_enable" false # ${SUDO_WWW} ${PATH_TO_MISP}/app/Console/cake Admin setSetting "Plugin.ZeroMQ_user_notifications_enable" false # ${SUDO_WWW} ${PATH_TO_MISP}/app/Console/cake Admin setSetting "Plugin.ZeroMQ_organisation_notifications_enable" false # ${SUDO_WWW} ${PATH_TO_MISP}/app/Console/cake Admin setSetting "Plugin.ZeroMQ_include_attachments" false # ${SUDO_WWW} ${PATH_TO_MISP}/app/Console/cake Admin setSetting "Plugin.ZeroMQ_tag_notifications_enable" false - Deixar o MISP disponível para todos os usuários:
# ${SUDO_WWW} ${PATH_TO_MISP}/app/Console/cake admin live 1
6. Histórico de Revisões do Documento
- Versão 1.0 Versão Inicial, 10/09/2020
- Versão 1.1 Atualização para instalação em Ubuntu 20.04 LTS, inclusão do sumário e da seção sobre considerações de segurança, e mudanças na formatação, 02/08/2021.
- Versão 1.2 Atualização da seção sobre considerações de segurança, 03/08/2021.
- Versão 1.3 Atualização da introdução do documento, 03/08/2021.
- Versão 1.4 Atualização dos comandos relacionados com a instalação e a configuração do MISP, 09/08/2021.
- Versão 1.5 Atualização dos comandos para instalação em Ubuntu 22.04 LTS, 16/07/2024.
- Versão 1.6 Atualização dos comandos para instalação do MISP versão 2.5 em Ubuntu 24.04 LTS, 05/10/2025.